
6 posts tagged with "Selenium"

View All Tags

· 6 min read
Etienne DEGUINE

Github Actions

Intro

In this post we will show you how to use our python SDK to automate the UI of a Flutter web app.

Video

The essential of this discussion is also narrated and demoed in this YouTube video: https://youtu.be/rAJhGGkdnsY

Motivation

As you have probably realized by now, a typical Flutter web app does not have a standard DOM, which makes it tricky to automate with a standard webdriver. Our technology works visually without relying on the DOM for finding elements or interacting with them. Thanks to these properties, we can automate a Flutter app in a simple way.

Walkthrough

  • We will first create a Flutter web app and look at its DOM
  • We will use our python SDK in interactive mode to ingest an element, explaining as we go how the way the SDK works in tandem with the labeling UI
  • We wil then run the script and verify correct behavior
  • Finally we will discuss what is required to run headless in production and the gotchas of screen resolution.

Flutter web app

First let's create the default Flutter template app

flutter create flutter_web_app
cd flutter_web_app
flutter run -d chrome --web-port 61612

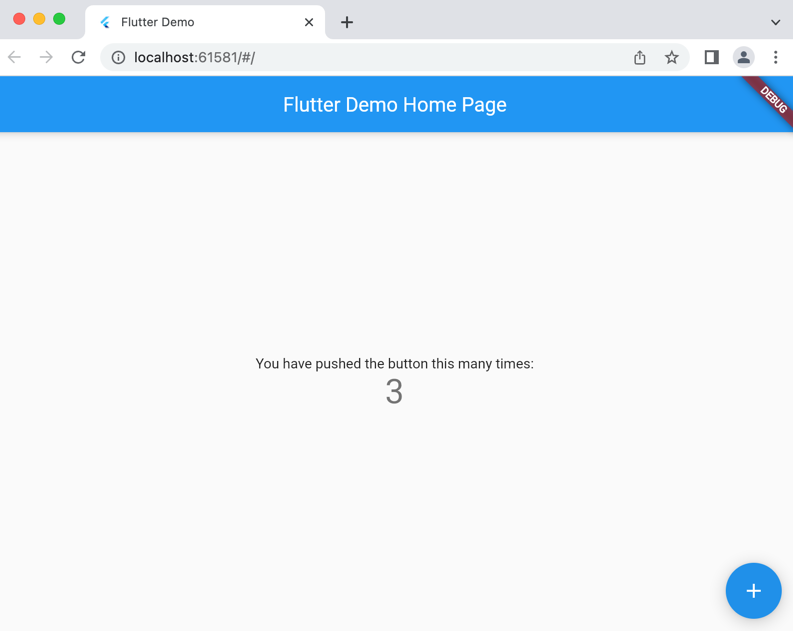
Chrome should open and you should see a UI counter with a push button to increase the counter like such Flutter template app

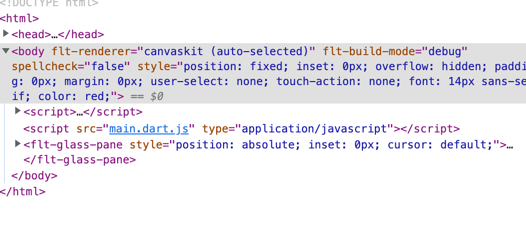
As we inspect the DOM we realize it's sparse, so there are no traditional locators to find the elements, no XPATH, id, etc Flutter DOM

Using the SDK

Our python SDK provides a way to find elements called driver.find_by_ai('element_name'). This function works visually, it takes a screenshot of the web page, the user then labels the screenshot with a bounding box to indicate where is the element, after what the SDK is able to find the element when the script is run.

To get started we need to first create a test script. It is important in our initialization to use the option use_cdp: True which enable Chrome Developer Protocol and allows deeper interaction that regular Selenium

Here is the script

test.py
from time import sleep

from selenium.webdriver import Chrome
from selenium.webdriver.common.by import By
from selenium.webdriver.chrome.service import Service
from webdriver_manager.chrome import ChromeDriverManager

from devtools_ai.selenium import SmartDriver

def _main() -> None:
"""Main driver"""
chrome_driver = Chrome(service=Service(ChromeDriverManager().install()))

# Convert chrome_driver to smartDriver
driver = SmartDriver(chrome_driver, api_key="??API_KEY??", initialization_dict={'use_cdp': True})

# Navigate to dev app
driver.get("http://localhost:61581/#/")
sleep(15)

# Find the searchbox and send "hello world"
print("Looking for element visually")
btn = driver.find_by_ai("push_button_flutter_0")
for i in range(12):
btn.click()
sleep(0.5)
sleep(5)
driver.quit()

if __name__ == "__main__":
_main()

Let's quickly break down the script:

  • driver = SmartDriver(chrome_driver, api_key='<your api key from smartdriver.dev-tools.ai>', initialization_dict={'use_cdp': True}) this line creates the wrapper around the Chromedriver to allow our SDK to automate the page. You need an API key, you can get started for 2 weeks for free on https://smartdriver.dev-tools.ai
  • driver.get("http://localhost:61581/#/") this line navigates to the app
  • sleep(15) my laptop is not super fast so it takes a while for the Flutter app to load, we have not implemented yet a way to wait for a Flutter app to load so we need to wait
  • btn = driver.find_by_ai("push_button_flutter_0") this line is the magic, it will take a screenshot of the page, open the labeling UI and ask you to label the element. You can see the labeling UI in the screenshot below labeler_UI
  • You can see that in the web UI i have placed a bounding box around the button that we want to push, after that i click confirm crop.
  • btn.click() this line will click the button

Running the script

Now that we have the script, let's run it

export DEVTOOLSAI_INTERACTIVE=TRUE
python3 test.py

The script will run, and at some point it will prompt you and open up the SmartDriver web UI to ask you to label the element as shown in the screenshot. If it is not working on your machine, you can set export DEVTOOLSAI_INTERACTIVE=FALSE and it will display the link to open in the test logs, it has the same effect. After labeling (clicking confirm crop), the script will resume running and click the button 12 times, then it will quit.

That's it, this is all there is is to automating a UI widget with dev-tools.ai.

Re-running the script: now that the element has been ingested, you can rerun the script like a regular test with

export DEVTOOLSAI_INTERACTIVE=FALSE
python3 test.py

This time it will not prompt you and run as intended.

Running headless in production

A word on screen resolutions

The visual matching algorithm is way more reliable when running always in the same resolution, that's why we recommend that you do your labeling by capturing the screenshots in the same resolution that you will use in your CI pipeline, you can achieve this with the following Chrome options:

from selenium.webdriver.chrome.options import Options

def main():
chrome_options = Options()
chrome_options.add_argument("--no-sandbox")
chrome_options.add_argument("--disable-dev-shm-usage")
chrome_options.add_argument("--headless")
chrome_options.add_argument('window-size=2400x1600')
chrome_driver = webdriver.Chrome(ChromeDriverManager().install(), options=chrome_options)

Running on Github Actions

We did another blog post explaining how to set up a GHA which install Chrome, Chromedriver and runs the test headless, you can refer to it here: https://docs.dev-tools.ai/blog/running-ui-tests-in-github-actions

Here is an example workflow for a smoke test in Flutter:

".github/workflows/main.yml
name: SDK client smoke test
on:
push:
paths:
- sdk/**/*
jobs:
Run-unit-tests:
runs-on: [self-hosted, linux]
steps:
- name: Get branch name
id: branch-name
uses: tj-actions/branch-names@v5
- run: echo "Running the tests and computing coverage"
- name: Check out repository code
uses: actions/checkout@v2
- run: echo "The ${{ github.repository }} repository has been cloned to the runner."
- run: echo "The workflow is now ready to test your code on the runner."
- uses: nanasess/setup-chromedriver@v1.0.7
- run: |
export DISPLAY=:99
sudo Xvfb -ac :99 -screen 0 1280x1024x24 > /dev/null 2>&1 &
- uses: subosito/flutter-action@v2
with:
channel: 'stable'
- name: Run python tests
run: |
cd ${{ github.workspace }}/sdk/python-sdk
python3.9 -m pip install -r requirements-unit-tests.txt
python3.9 tests/basic_crawl.py
- name: Run python flutter tests
run: |
cd ${{ github.workspace }}/sdk/python-sdk
python3.9 -m pip install -r requirements-unit-tests.txt
cd tests/flutter_test_app/
flutter run -d web-server --web-port 61612 &
sleep 30
cd ../../
python3.9 tests/flutter_test.py
- name: Run java tests
run: |
cd ${{ github.workspace }}/sdk/java-selenium-sdk
gradle test --stacktrace

In your flutter_test.py make sure to sleep long enough to let the app load, you can use the following code to wait for the app to load:

    from time import sleep
driver.get("http://localhost:61612/#/")
sleep(42)

# Find the push button and press it
element = driver.find_by_ai('flutter_push_button')

Conclusion

The features exhibited here are currently available in our Python SDK, the first two weeks to verify that it does what you want are free after what you can see the pricing on https://dev-tools.ai.

Everything is self-serve but feel free to say hi on our Discord if you have issues or feature requests: https://discord.gg/2J9WEYdq5C

Thanks and happy testing!

· One min read
Chris Navrides

Robot looking at a computer

Web pages have lots of elements

Today a modern web application has hundreds or thousands of elements on each page. Most of these elements are only there for styling or because the framework used automatically added them in there. This complicates the process of finding and interacting with the right element. Additionally it can slow down operations during test runs because all of these elements must be filtered down.

YOLO (You Only Look Once)

With advances in computer vision and object detection model architectures, you can now find objects quickly from an image. At Dev Tools we used AI models, like YOLO, and train them specifically on web and mobile apps to find elements. Today we are happy to share that the results are looking amazing!

Amazon.com

View of Amazon

NYTimes.com

View of NYTimes

Next Steps

As a next step to further train the AI, we are working on training the AI not to just detect elements, but understand what the elements are. Imagine the possibilities of seeing objects on the screen not as boxes, but as search icons, and shopping carts :)

Icon Understanding

· 4 min read
Etienne DEGUINE

Ant colony galleries aboriginal art

Intro

In this post we will show you how we built the site scanner scan_domain feature in our SDK. We will go over collecting JS error logs and network calls with Chomedriver and Chrome Developer Protocol (CDP) in Python with Selenium.

Scenario

We want to crawl a given domain with a given depth and collect JS errors from the console as well as HTTP requests with status code >= 400.

General design

We are going to traverse the site BFS. The link_manager will keep track of visited urls for us and handle the traversal logic.

scan.py
from urllib.parse import urlparse
class SmartDriver:
def __init__(self, webdriver, api_key, options={}):
...

def scan_domain(self, url, max_depth=5):
self.domain = urlparse(url).netloc # extract the domain
self.link_manager.add_link(url, url, depth=0)
while self.link_manager.has_more_links():
referrer, link, depth = self.link_manager.get_link()
try:
if depth <= max_depth:
self.process_link(link, referrer, depth)
else:
log.info(f'Skipping link {link} because it is too deep {depth}')
except Exception as e:
log.error(f"Error processing link {link}: {e}")

Initializing Chromedriver with CDP

To collect the right data we need console and performance logs from Chromedriver. The Chrome Developer Protocol (CDP) gives us access to this, we need to enable these additional features with a DesiredCapability goog:loggingPrefs, we also need to issue two CDP commands to enable these logs.

chromedriver.py
from selenium.webdriver import DesiredCapabilities
from selenium.webdriver.chrome.service import Service
from webdriver_manager.chrome import ChromeDriverManager

# make chrome log requests
capabilities = DesiredCapabilities.CHROME
capabilities['goog:loggingPrefs'] = {'performance': 'ALL', 'browser': 'ALL'}
driver = Chrome(service=Service(ChromeDriverManager().install()), desired_capabilities=capabilities)
driver.execute_cdp_cmd("Network.enable", {})
driver.execute_cdp_cmd("Console.enable", {})

For each link, we will clear the logs, get the url then check the console error logs and the HTTP status codes.

process_link.py
    def process_link(self, link, referrer, depth):
_ = self.driver.get_log('browser') # clear logs
_ = self.driver.get_log('performance')
self.driver.get(link)
sleep(2.0)
log.info(f"Processing link {link}")
console_logs = self.driver.get_log("browser")
self.process_console_logs(console_logs, link)

perf_logs = self.driver.get_log("performance")
self.process_perf_logs(perf_logs, link)

log.info(f'Visited {link}')
self.link_manager.visited_link(link)
local_referrer = link

links = self.driver.find_elements(By.TAG_NAME, 'a')
for link in links:
if urlparse(link.get_attribute('href')).netloc == self.domain:
self.link_manager.add_link(local_referrer, link.get_attribute('href'), depth + 1)

Processing the console logs

We simply look at the messages from the console, check for the a SEVERE log or for the word 'error'.

process_console_logs.py
    def is_js_error(message):
#implement some logic here to filter out the errors you want
return 'error' in message.lower()

def process_console_logs(self, console_logs, link):
for l in console_logs:
if (l['level'] == 'SEVERE'):
log.debug(f"Bad JS: {l['message']}")
self.save_js_error(l['message'])
else:
if is_js_error(l['message']):
log.debug(f"Bad JS: {l['message']}")
self.save_js_error(l['message'])

Processing the network logs

We get the log messages in JSON format, so we load them up in memory and filter for Network.responseReceived. After that we simply look at the status code to decide which requests are bad.

process_network_logs
    def process_perf_logs(self, perf_logs, link):
perf_logs = [json.loads(lr["message"])["message"] for lr in perf_logs]
responses = [l for l in perf_logs if l["method"] == "Network.responseReceived"]
for r in responses:
status = r['params']['response']['status']
if status >= 400:
log.debug(f"Bad request: {status} {r['params']['response']['url']}")
self.save_bad_request(r['params']['response']['url'], status, link)

Everything together

When putting everything togethere, we have a simple crawler that registeres JS errors and bad HTTP requests. This whole feature is already implemented in our SDK, to use it simply make sure you set the desired capability googLoggingPrefs to 'performance' and 'browser'.

Here is a sample script to scan all the URLs in a text file.

scan.py
from time import sleep

from selenium.webdriver import Chrome
from selenium.webdriver.common.by import By
from selenium.webdriver.chrome.service import Service
from webdriver_manager.chrome import ChromeDriverManager
import logging
logging.basicConfig(level=logging.INFO)


from devtools_ai.selenium import SmartDriver
from selenium.webdriver.chrome.options import Options
from selenium.webdriver import DesiredCapabilities

# import actionchains
from selenium.webdriver.common.action_chains import ActionChains
import os

def scan(url):
"""Main driver"""
chrome_options = Options()
chrome_options.add_argument("--no-sandbox")
chrome_options.add_argument("--disable-dev-shm-usage")
chrome_options.add_argument("--headless")

# make chrome log requests
capabilities = DesiredCapabilities.CHROME
capabilities['goog:loggingPrefs'] = {'performance': 'ALL', 'browser': 'ALL'}
driver = Chrome(service=Service(ChromeDriverManager().install()), desired_capabilities=capabilities, options=chrome_options)
try:
# Convert chrome_driver to smartDriver
driver = SmartDriver(driver, api_key="??API_KEY??") # get your API key at https://smartdriver.dev-tools.ai/


# Navigate to Google.com
driver.scan_domain(url, max_depth=4)
driver.quit()
except Exception as e:
logging.error(e)
driver.quit()


if __name__ == "__main__":
with open('urls.txt') as f:
urls = f.readlines()
for url in urls:
scan(url)
sleep(1)

· 2 min read
Chris Navrides

visualize locators

Maintaining Automation is Hard

I have written and maintained mostly mobile test scripts for my whole career. It is really hard to keep track of which element is where on a page. Good resource names are helpful, comments are great, but in a codebase with multiple contributors that is hard to always keep clean.

Idea

When talking to my friend Kirk we were discussing this exact problem of maintaining test scripts. We thought; "wouldn't it be awesome if we could visualize the locators when we are writing/looking at the tests?"

Right then a light bulb went off. Kirk, who has developed plugins for VSCode, knew there may be a way to do this if we could host the element image. With Dev Tools we have the element image for all the locators. So we quickly sketched out how we could do this and got to work.

How it works

In VSCode we a plugin can read the content of your script. There are decorators already that will show a method's doc string. However, we only needed doc string for locator methods. To solve this we had to build a regex to find the various locator methods that a framework can have.

Here's an example of Selenium Python's locator checks we built:

let matches = line.match(/.(find_[^(]+)\(([^)]+)\)/);

Next we had to let the user know that we have added this functionality. To do this we found a way to include our company logo as an icon and put it next to the locators. We also added an udnerline to the locator to show it had a mouse over property now.

The final product is the image you see above. You can try it for yourself on the VSCode Marketplace and let us know what you think.

NOTE: It currently only supports Python Selenium, but more languages and frameworks will be coming in the next few weeks.

How can it be better?

We have made this an open source project here. We welcome any pull requests or feature requests.

We are also avaible on our Discord if you want to discuss more about this or testing/automation in general :)

· 4 min read
Chris Navrides

Robots for fun

Intro

Automation is usually reserved just for work tasks and projects. However once you know how to automate it, you can make use of it for fun projects.

Problem

Say we want to automate the all the scores from 2021-2022 year's English Football's Premier League from flashscore.com

Challenge

To solve this there will be a few challenges that we need to think through:

  1. Figure out what data structure to use for storing the data.
  2. Identify the teams and the scores. These will be selectors.
  3. We will then need to a way to tie these together so that we know two teams played eachother.

Data Structure

When thinking about data structures we should look at the what data we are trying to store. In this case we need the game information. For each game we need to know each team and their score.

Because there are multiple pieces of data that we will want to keep group together, the best way to handle this is a dictionary. We will create a dictionary object for each game, where we can have the team name, and scores.

Our "game" dictionary will look like the following:

{
'home_team': string,
'away_team': string,
'home_score': int,
'away_score': int
}

Identify the Teams + Scores

Now that we have our data structure figured out, we will need to find the team name and score for each game. To do this we will look at the page and see if there is a selector we can use for these.

Within chrome, we will hover over a team name, right click and inspect.

score box

Inspecting the team names they look like the following:

<div class="event__participant event__participant--home fontBold">Arsenal</div>`
<div class="event__participant event__participant--away">Everton</div>`

Looking at the scores, they have similar class names:

<div class="event__score event__score--home">5</div>
<div class="event__score event__score--away">1</div>

Building the selectors

The easiest way to get all the team names appears to be with the classname event__participant and the easiest way to get the score is with class name event__score.

To do we will collect all elements with those class name and iterate them, and add each name/score to a list. Using python css selector type the code looks like this:

driver.find_elements(By.CLASS_NAME, "event__participant")
driver.find_elements(By.CLASS_NAME, "event__score")

Tieing it together

Now that we have all the team names and scores, we need to put them in games. To do this we use the fact that each game has two teams, so we iterate the list of elements by 2 and group them together in 1 game. The first team is always listed as the home team, and the second one is always the away team.

Assuming each team name is in a list called "teams", then we will want to go through the list by 2. The way I like to do this is to just take the length of the list, divide it by 2, then just find the first and second value.

for i in range(int(len(teams)/2)):
home_team_name = teams[i*2] # 0, 2, 4, ...
away_team_name = teams[i*2 + 1] # 1, 3, 5, ...

Final Script

The final code sample to grab all the scores is below. You can now do any data manipulation you'd like to have fun with the scores :)

from time import sleep

from selenium.webdriver import Chrome
from selenium.webdriver.common.by import By
from selenium.webdriver.chrome.service import Service
from webdriver_manager.chrome import ChromeDriverManager

def _main() -> None:
"""Main driver"""
driver = Chrome(service=Service(ChromeDriverManager().install()))

driver.get("https://www.flashscore.com/football/england/premier-league-2021-2022/results/")
sleep(1) # lazy load the site

teams = []
scores = []
dates = []
team_names = driver.find_elements(By.CLASS_NAME, "event__participant")
for elem in team_names:
teams.append(elem.text)

score_val = driver.find_elements(By.CLASS_NAME, "event__score")
for elem in score_val:
scores.append(elem.text)

games = []
for i in range(int(len(teams)/2)):
game_event = {
'home_team': teams[i*2],
'away_team': teams[i*2 + 1],
'home_score': scores[i*2],
'away_score': scores[i*2 + 1]
}
games.append(game_event)

for game in games:
print('{home_team} - {home_score}\n{away_team} - {away_score}\n'.format(**game))

driver.quit()

if __name__ == "__main__":
_main()

· 3 min read
Etienne DEGUINE

Github Actions

Intro

In this post we will show you how to set up UI tests with Selenium in headless mode in your Github Actions workflow

Scenario

You want to load up google.com and send the search query "Hello World", then checks that the query exists in the HTML source. You then want to run this script every 15 minutes in GHA.

Selenium test script

Here is the script we will use (search_google.py)

search_google.py
from time import sleep

from selenium import webdriver
from selenium.webdriver.common.by import By
from selenium.webdriver.chrome.options import Options

def main():
chrome_options = Options()
chrome_options.add_argument("--no-sandbox")
chrome_options.add_argument("--disable-dev-shm-usage")
chrome_options.add_argument("--headless")
chrome_options.add_argument('window-size=1280x1024')

driver = webdriver.Chrome(chrome_options=chrome_options)

driver.get("https://google.com")
sleep(1)

# Find the searchbox and send "hello world"
searchbox_element = driver.find_element(By.NAME, 'q')
searchbox_element.send_keys("Hello World\n")
sleep(2)

html = driver.page_source
assert('Hello World' in html)

driver.quit()
if __name__ == "__main__":
main()

You can run this script locally, for instance for debugging, with the following steps, provided Chromedriver is installed in ~/chromedrivers

export PATH=/Users/some_user/chromedrivers:$PATH
python3 -m pip install selenium
python3 search_google.py

Setting up GHA

First let's create a requirements file for our action. It's called requirements-smoke.txt

requirements-smoke.txt
selenium==4.3.0
.github/workflows/ui-test.yaml
name: My UI tests pipeline
on:
schedule:
- cron: '*/15 * * * *'
jobs:
Run-tests-code-quality:
runs-on: ubuntu-latest
steps:
- uses: actions/checkout@v2
- run: echo "Running the tests"
- run: echo "The ${{ github.repository }} repository has been cloned to the runner."
- uses: nanasess/setup-chromedriver@v1.0.7
- run: |
export DISPLAY=:99
sudo Xvfb -ac :99 -screen 0 1280x1024x24 > /dev/null 2>&1 &
- name: run UI tests
run : |
cd ${{ github.workspace }}
python3 -m pip install -r requirements-smoke.txt
python3 search_google.py

Details

Basically two things are happening, first we set up chromedriver.

- uses: nanasess/setup-chromedriver@v1.0.7

Second, we create a X-Window virtual frame buffer (Xvfb) which is basically a fake screen of resolution 1280x1024. This resolution matches the window_size parameters in the script.

export DISPLAY=:99
sudo Xvfb -ac :99 -screen 0 1280x1024x24 > /dev/null 2>&1 &

Conclusion

We saw how to set up UI tests with Selenium in headless mode in your Github Actions workflow. We use a GHA to set up the chromedriver and then a XVFB to act as the screen.

Going further

If you run UI tests, you might be interested in our product, devtools_ai. It is a library to make UI tests less flaky. It automatically handles broken UI selectors (for instance after an HTML / React code change) and kicks in using visual ML to still interact with the same element. It uses the visual aspect of elements under the hood, so it does not break as long as the UI looks the same.

You can check it out at dev-tools.ai

Making a test case robust with our library is only two lines of code, the test above would look like this:

search_google_non_flaky.py
from time import sleep

from selenium import webdriver
from selenium.webdriver.common.by import By
from selenium.webdriver.chrome.options import Options

from devtools_ai.selenium import SmartDriver

def main():
chrome_options = Options()
chrome_options.add_argument("--no-sandbox")
chrome_options.add_argument("--disable-dev-shm-usage")
chrome_options.add_argument("--headless")
chrome_options.add_argument('window-size=1280x1024')

driver = webdriver.Chrome(chrome_options=chrome_options)
driver = SmartDriver(driver, "my_api_key") # get your API key at https://smartdriver.dev-tools.ai/signup

driver.get("https://google.com")
sleep(1)

# Find the searchbox and send "hello world"
searchbox_element = driver.find_element(By.NAME, 'q')
searchbox_element.send_keys("Hello World\n")
sleep(2)

html = driver.page_source
assert('Hello World' in html)

driver.quit()
if __name__ == "__main__":
main()